Intro to x86-64
This room teaches the basics of x86-64 assembly language
💢 We will cover the topics
- Reverse Engineering
- Radar 2 Fundamentals
Task 1 Description and Objectives
This room will look at the basic primitives of Intel's x86-64 assembly language, and will use these primitives to understand the construction of basic programs using loops, functions and procedures. The tasks attached to this room will use the r2 reverse engineering framework, which will come installed in the machine attached to this room. The username of the machine attached to the next task is tryhackme and the password is reismyfavl33t. To access the machine, SSH into it on port 22.
Here are a few things to note before beginning the room:
- this room will use the AT&T syntax. In general, people either use the AT&T syntax or the Intel Syntax(differences are highlighted here).
- This room aims to be a gentle introduction to radare2. While they are not shown here, radare has a lot of powerful features and tools which can be found here, here and here
- As soon as your start r2, remember to enter e asm.syntax=att to ensure that you are using the AT&T syntax.
- The addresses shown on the images in the tasks below may be different from the addresses you view when you disassemble the files.
- Read the above.
No answer needed
Task 2 Introduction
Computers execute machine code, which is encoded as bytes, to carry out tasks on a computer. Since different computers have different processors, the machine code executed on these computers is specific to the processor. In this case, we’ll be looking at the Intel x86-64 instruction set architecture which is most commonly found today. Machine code is usually represented by a more readable form of the code called assembly code. This machine is code is usually produced by a compiler, which takes the source code of a file, and after going through some intermediate stages, produces machine code that can be executed by a computer. Without going into too much detail, Intel first started out by building 16-bit instruction set, followed by 32 bit, after which they finally created 64 bit. All these instruction sets have been created for backward compatibility, so code compiled for 32 bit architecture will run on 64 bit machines. As mentioned earlier, before an executable file is produced, the source code is first compiled into assembly(.s files), after which the assembler converts it into an object program(.o files), and operations with a linker finally make it an executable.
The best way to actually start explaining assembly is by diving in. We’ll be using radare2 to do this - radare2 is a framework for reverse engineering and analysing binaries. It can be used to disassemble binaries(translate machine code to assembly, which is actually readable) and debug said binaries(by allowing a user to step through the execution and view the state of the program).
The first step is to execute the program intro by running ./intro
Which then just shows the following output

From the execution, it can be seen that the program is creating two variables and switching their values. Time to see what it’s actually doing under the hood!
Go to the introduction folder on the virtual machine and run the command: r2 -d intro
This will open the binary in debugging mode. Once the binary is open, one of the first things to do is ask r2 to analyze the program, and this can be done by typing in: aa
Which is the most common analysis command. It analyses all symbols and entry points in the executable.
The run e asm.syntax=att to set the disassembly syntax to AT&T.
The analysis in this case involves extracting function names, flow control information and much more! r2 instructions are usually based on a single character, so it is easy to get more information about the commands. For general help, run: ?
For more specific information, for example, about analysis, run a?
Once the analysis is complete, you would want to know where to start analysing from - most programs have an entry point defined as main. To find a list of the functions run: afl

As seen here, there actually is a function at main. Let’s examine the assembly code at main by running the command pdf @main
Where pdf means print disassembly function. Doing so will give us the following view
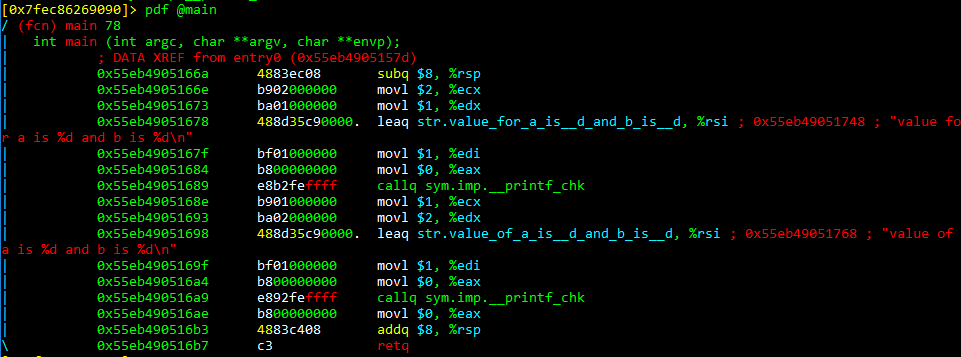
As we can see from above, the values on the complete left column are memory addresses of the instructions, and these are usually stored in a structure called the stack(which we will talk about later). The middle column contains the instructions encoded in bytes(what is usually the machine code), and the last column actually contains the human readable instructions.
The core of assembly language involves using registers to do the following:
- Transfer data between memory and register, and vice versa
- Perform arithmetic operations on registers and data
- Transfer control to other parts of the program
Since the architecture is x86-64, the registers are 64 bit and Intel has a list of 16 registers:
| 64 bit | 32 bit |
|---|---|
| %rax | %eax |
| %rbx | %ebx |
| %rcx | %ecx |
| %rdx | %edx |
| %rsi | %esi |
| %rdi | %edi |
| %rsp | %esp |
| %rbp | %ebp |
| %r8 | %r8d |
| %r9 | %r9d |
| %r10 | %r10d |
| %r11 | %r11d |
| %r12 | %r12d |
| %r13 | %r13d |
| %r14 | %r14d |
| %r15 | %r15d |
Even though the registers are 64 bit, meaning they can hold up to 64 bits of data, other parts of the registers can also be referenced. In this case, registers can also be referenced as 32 bit values as shown. What isn’t shown is that registers can be referenced as 16 bit and 8 bit(higher 4 bit and lower 4 bit).
The first 6 registers are known as general purpose registers. The %rsp is the stack pointer and it points to the top of the stack which contains the most recent memory address. The stack is a data structure that manages memory for programs. %rbp is a frame pointer and points to the frame of the function currently being executed - every function is executed in a new frame. To move data using registers, the following instruction is used: movq source, destination
This involves:
- Transferring constants(which are prefixed using the $ operator) e.g. movq $3 rax would move the constant 3 to the register
- Transferring values from a register e.g. movq %rax %rbx which involves moving value from rax to rbx
- Transferring values from memory which is shown by putting registers inside brackets e.g. movq %rax (%rbx) which means move value stored in %rax to memory location represented by %rbx.
The last letter of the mov instruction represents the size of the data:
| Intel Data Type | Suffix | Size(bytes) |
|---|---|---|
| Byte | b | 1 |
| Word | w | 2 |
| Double Word | l | 4 |
| Quad Word | q | 8 |
| Single Precision | s | 4 |
| Double Precision | l | 8 |
When dealing with memory manipulation using registers, there are other cases to be considered:
- (Rb, Ri) = MemoryLocation[Rb + Ri]
- D(Rb, Ri) = MemoryLocation[Rb + Ri + D]
- (Rb, Ri, S) = MemoryLocation(Rb + S * Ri]
- D(Rb, Ri, S) = MemoryLocation[Rb + S * Ri + D]
Some other important instructions are:
leaq source, destination: this instruction sets destination to the address denoted by the expression in sourceaddq source, destination: destination = destination + sourcesubq source, destination: destination = destination - sourceimulq source, destination: destination = destination * sourcesalq source, destination: destination = destination << source where << is the left bit shifting operatorsarq source, destination: destination = destination >> source where >> is the right bit shifting operatorxorq source, destination: destination = destination XOR sourceandq source, destination: destination = destination & sourceorq source, destination: destination = destination | source
Before understanding how programs work, it is important to understand registers, memory manipulation and some basic instructions. The next sections will have more hands on use of radare2.
- Read and experiment with the above.
tryhackme@ip-10-10-157-0:~$ cd introduction/
tryhackme@ip-10-10-157-0:~/introduction$ ls
intro  intro.c
tryhackme@ip-10-10-157-0:~/introduction$ ./intro
value for a is 1 and b is 2
value of a is 2 and b is 1
tryhackme@ip-10-10-157-0:~/introduction$ r2 -d intro
Process with PID 1403 started...
= attach 1403 1403
bin.baddr 0x55a23ea29000
Using 0x55a23ea29000
asm.bits 64
 -- radare2 0.9.7 is so old, my grandfarther was using it with his enigma in WWII
[0x7feb629b2090]> aa
[x] Analyze all flags starting with sym. and entry0 (aa)
[0x7feb629b2090]> e asm.syntax=att
[0x7feb629b2090]> ?
Usage: [.][times][cmd][~grep][@[@iter]addr!size][|>pipe] ; ...
Append '?' to any char command to get detailed help
Prefix with number to repeat command N times (f.ex: 3x)
| %var=value              alias for 'env' command
| *[?] off[=[0x]value]    pointer read/write data/values (see ?v, wx, wv)
| (macro arg0 arg1)       manage scripting macros
| .[?] [-|(m)|f|!sh|cmd]  Define macro or load r2, cparse or rlang file
| _[?]                    Print last output
| =[?] [cmd]              send/listen for remote commands (rap://, raps://, udp://, http://, <fd>)
| <[...]                  push escaped string into the RCons.readChar buffer
| /[?]                    search for bytes, regexps, patterns, ..
| ![?] [cmd]              run given command as in system(3)
| #[?] !lang [..]         Hashbang to run an rlang script
| a[?]                    analysis commands
| b[?]                    display or change the block size
| c[?] [arg]              compare block with given data
| C[?]                    code metadata (comments, format, hints, ..)
| d[?]                    debugger commands
| e[?] [a[=b]]            list/get/set config evaluable vars
| f[?] [name][sz][at]     add flag at current address
| g[?] [arg]              generate shellcodes with r_egg
| i[?] [file]             get info about opened file from r_bin
| k[?] [sdb-query]        run sdb-query. see k? for help, 'k *', 'k **' ...
| l [filepattern]         list files and directories
| L[?] [-] [plugin]       list, unload load r2 plugins
| m[?]                    mountpoints commands
| o[?] [file] ([offset])  open file at optional address
| p[?] [len]              print current block with format and length
| P[?]                    project management utilities
| q[?] [ret]              quit program with a return value
| r[?] [len]              resize file
| s[?] [addr]             seek to address (also for '0x', '0x1' == 's 0x1')
| t[?]                    types, noreturn, signatures, C parser and more
| T[?] [-] [num|msg]      Text log utility (used to chat, sync, log, ...)
| u[?]                    uname/undo seek/write
| v                       visual mode (v! = panels, vv = fcnview, vV = fcngraph, vVV = callgraph)
| w[?] [str]              multiple write operations
| x[?] [len]              alias for 'px' (print hexadecimal)
| y[?] [len] [[[@]addr    Yank/paste bytes from/to memory
| z[?]                    zignatures management
| ?[??][expr]             Help or evaluate math expression
| ?$?                     show available '$' variables and aliases
| ?@?                     misc help for '@' (seek), '~' (grep) (see ~??)
| ?>?                     output redirection
[0x7feb629b2090]> a?
Usage: a  [abdefFghoprxstc] [...]
| aa[?]              analyze all (fcns + bbs) (aa0 to avoid sub renaming)
| a8 [hexpairs]      analyze bytes
| ab[b] [addr]       analyze block at given address
| abb [len]          analyze N basic blocks in [len] (section.size by default)
| ac[?]              manage classes
| aC[?]              analyze function call
| aCe[?]             same as aC, but uses esil with abte to emulate the function
| ad[?]              analyze data trampoline (wip)
| ad [from] [to]     analyze data pointers to (from-to)
| ae[?] [expr]       analyze opcode eval expression (see ao)
| af[?]              analyze Functions
| aF                 same as above, but using anal.depth=1
| ag[?] [options]    draw graphs in various formats
| ah[?]              analysis hints (force opcode size, ...)
| ai [addr]          address information (show perms, stack, heap, ...)
| aL                 list all asm/anal plugins (e asm.arch=?)
| an [name] [@addr]  show/rename/create whatever flag/function is used at addr
| ao[?] [len]        analyze Opcodes (or emulate it)
| aO[?] [len]        Analyze N instructions in M bytes
| ap                 find prelude for current offset
| ar[?]              like 'dr' but for the esil vm. (registers)
| as[?] [num]        analyze syscall using dbg.reg
| av[?] [.]          show vtables
| ax[?]              manage refs/xrefs (see also afx?)
[0x7feb629b2090]> afl
0x55a23ea29560    1 42           entry0
0x55a23ec29fe0    1 4124         reloc.__libc_start_main
0x55a23ea29590    4 50   -> 40   sym.deregister_tm_clones
0x55a23ea295d0    4 66   -> 57   sym.register_tm_clones
0x55a23ea29620    5 58   -> 51   entry.fini0
0x55a23ea29550    1 6            sym..plt.got
0x55a23ea29660    1 10           entry.init0
0x55a23ea29730    1 2            sym.__libc_csu_fini
0x55a23ea29734    1 9            sym._fini
0x55a23ea296c0    4 101          sym.__libc_csu_init
0x55a23ea2966a    1 78           main
0x55a23ea29540    1 6            sym.imp.__printf_chk
0x55a23ea29510    3 23           sym._init
0x55a23ea29000    3 97   -> 123  map.home_tryhackme_introduction_intro.r_x
[0x7feb629b2090]> pdf @main
/ (fcn) main 78
|   int main (int argc, char **argv, char **envp);
|           ; DATA XREF from entry0 (0x55a23ea2957d)
|           0x55a23ea2966a      4883ec08       subq $8, %rsp
|           0x55a23ea2966e      b902000000     movl $2, %ecx
|           0x55a23ea29673      ba01000000     movl $1, %edx
|           0x55a23ea29678      488d35c90000.  leaq str.value_for_a_is__d_and_b_is__d, %rsi ; 0x55a23ea29748 ; "value for a is %d and b is %d\n"
|           0x55a23ea2967f      bf01000000     movl $1, %edi
|           0x55a23ea29684      b800000000     movl $0, %eax
|           0x55a23ea29689      e8b2feffff     callq sym.imp.__printf_chk
|           0x55a23ea2968e      b901000000     movl $1, %ecx
|           0x55a23ea29693      ba02000000     movl $2, %edx
|           0x55a23ea29698      488d35c90000.  leaq str.value_of_a_is__d_and_b_is__d, %rsi ; 0x55a23ea29768 ; "value of a is %d and b is %d\n"
|           0x55a23ea2969f      bf01000000     movl $1, %edi
|           0x55a23ea296a4      b800000000     movl $0, %eax
|           0x55a23ea296a9      e892feffff     callq sym.imp.__printf_chk
|           0x55a23ea296ae      b800000000     movl $0, %eax
|           0x55a23ea296b3      4883c408       addq $8, %rsp
\           0x55a23ea296b7      c3             retq
No answer needed
Task 3 If Statements
The general format of an if statement is
if(condition){
    do-stuff-here
} else if(condition) //this is an optional condition {
    do-stuff-here
} else {
    do-stuff-here
}
If statements use 3 important instructions in assembly:
- cmpq source2, source1: it is like computing a-b without setting destination
- testq source2, source1: it is like computing a&b without setting destination
Jump instructions are used to transfer control to different instructions, and there are different types of jumps:
| Jump Type | Description |
|---|---|
| jmp | Unconditional |
| je | Equal/Zero |
| jne | Not Equal/Not Zero |
| js | Negative |
| jns | Nonnegative |
| jg | Greater |
| jge | Greater or Equal |
| jl | Less |
| jle | Less or Equal |
| ja | Above(unsigned) |
| jb | Below(unsigned) |
The last 2 values of the table refer to unsigned integers. Unsigned integers cannot be negative while signed integers represent both positive and negative values. SInce the computer needs to differentiate between them, it uses different methods to interpret these values. For signed integers, it uses something called the two’s complement representation and for unsigned integers it uses normal binary calculations.
- Read and experiment with the above.
No answer needed
Task 4 If Statements Continued
Go to the if-statement folder and Start r2 with r2 -d if1
And run the following commands:
aaaaflpdf @main
This analyses the program, lists the functions and disassembles the main function.

We’ll then start by setting a break point on the jge and the jmp instruction by using the command:
db 0x55ae52836612(which is the hex address of the jge instruction)db 0x55ae52836618(which is the hex address of the jmp instruction)
We’ve added breakpoints to stop the execution of the program at those points so we can see the state of the program. Doing so will show the following:

We now run dc to start execution of the program and the program will start execution and stop at the break point. Let’s examine what has happened before hitting the breakpoint:
- The first 2 lines are about pushing the frame pointer onto the stack and saving it(this is about how functions are called, and will be examined later)
- The next 3 lines are about assigning values 3 and 4 to the local arguments/variables var_8h and var_4h. It then stores the value in var_8h in the %eax register.
- The
cmplinstruction compares the value of eax with that of the var_8h argument
To view the value of the registers, type in: dr

We can see that the value of rax, which is the 64 bit version of eax contains 3. We saw that the jge instruction is jumping based on whether value of eax is greater than var_4h. To see what’s in var_4h, we can see that at top of the main function, it tells us the position of var_4h. Run the command: px @rbp-0x4
And that shows the value of 4.
We know that eax contains 3, and 3 is not greater than 4, so the jump will not execute. Instead it will move to the next instruction. To check this, run the ds command which seeks/moves onto the next instruction.
The rip(which is the current instruction pointer) shows that it moves onto the next instruction - which shows we are correct. The current instruction then adds 5 to var_8h which is a local argument. To see that this actually happens, first check the value of var_8h, run ds and check the value again. This will show it increments by 5.

Note that because we are checking the exact address, we only need to check to 0 offset. The value stored in memory is stored as hex.
The next instruction is an unconditional jump and it just jumps to clearing the eax register. The popq instruction involves popping a value of the stack and reading it, and the return instruction sets this popped value to the current instruction pointer. In this case, it shows the execution of the program has been completed. To understand better about how an if statement work, you can check the corresponding C file in the same folder.
The following questions involve analysing the if2 binary.
- What is the value of var_8h before the popq and ret instructions?
96
- what is the value of var_ch before the popq and ret instructions?
0
- What is the value of var_4h before the popq and ret instructions?
1
- What operator is used to change the value of var_8h, input the symbol as your answer(symbols include +, -, *, /, &, |):
&
Task 5 Loops
Usually two types of loops are used: for loops and while loops. The general format of a while loops is:
while(condition) {
    Do-stuff-here
    Change value used in condition
}
The general format of a for loop is
for(initialise value: condition; change value used in condition) {
    do-stuff-here
}
Let’s start looking up loops by entering the loops folder, running r2 with the loops 1 file. After this, analyse everything, list the functions and disassemble the main function.

Let start of by setting a break point at the jmp instruction using the command: db address-of-instruction
Doing this allows use to skip the first few lines of instructions, which as we saw using if statements, it just passing in values to local arguments(note that the constant showed by $0xa represents that value of 10 in hex). Once execution reaches the breakpoint at the jmp instruction, run ds to move to the next instruction. Since this is an unconditional jump, it will move to the cmpl instruction.

Here the cmpl instruction is trying to compare what’s in the local argument var_ch with the value 8. To see what’s in var_ch, check the start of the disassembled function and check the memory. In this case, it is rbp-0xc

And shows that it contains 4. The next instruction is a jle which is going to check is the value is var-ch is less than or equal to 8. Since 4 is less than 8, it will jump to the addl instruction.

The addl instruction will add 2 to the value of var-ch and continue to go to the cmpl instruction. Since 2 was added to var_ch, var_ch will now contain 6 which is still less than 8, and it will jump back to the addl instruction. This can be seeing by continuing execution using the ds statement. We know this is a loop because the addl instruction is being executed more than once, and this is in combination with comparing the value of var_ch to 8. So we can infer the structure of the loop to be
while(var_ch < 8) {
    var_ch = var_ch + 2
}
A quicker way to examine the loop would be to add a break point to cmpl instruction and running dc. Since this is a loop, the program will always break at the cmpl instruction(because this instruction checks the condition before executing what is inside the loop). You can check the loop1.c file to see the structure of the loop!
Use the loop2 binary to answer the following questions.
- What is the value of var_8h on the second iteration of the loop?
5
- What is the value of var_ch on the second iteration of the loop?
0
- What is the value of var_8h at the end of the program?
2
- What is the value of var_ch at the end of the program?
0
Task 6 crackme1
Go to the crackme folder and analyse the crackme1 binary. This binary checks if the user has a correct password, and this can be done by running the binary and entering the password.
- What is the password?
127.0.0.1
Task 7 crackme2
Analyse the crackme2 binary and try find the correct password, as with the previous question.
- What is the correct password?
/home/tryhackme/install-files/secret.txt
kali@kali:~/CTFs/tryhackme/Intro to x86-64$ echo vs3curepwd | rev
dwperuc3sv
dwperuc3sv